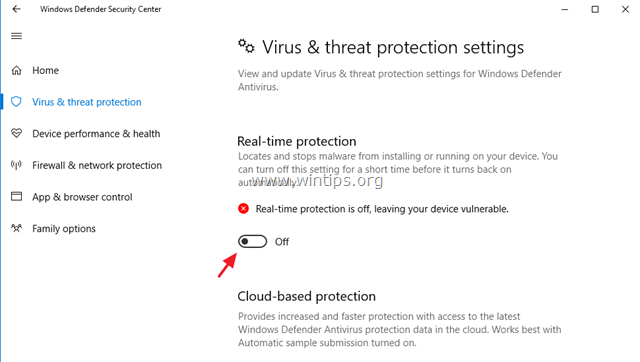
Method 1. Disable Windows Defender Antivirus from Windows GUI.
Method 1. Disable Windows Defender Antivirus from Windows GUI.
Step 1. Turn OFF Windows Defender Antivirus Real Time Protection.
To turn off Real-time Protection, double-click at the Windows Defender icon in the taskbar, click Virus & threat protection, and then at Virus & threat Protection settings set to OFF the Real-time Protection and the Cloud-delivered protection.

Step 2. Modify Registry Permissions and Disable Defender Antispyware & Antivirus Protection.
1. Open Registry editor. To do that:
1. Simultaneously press the “Win” + “R” keys to load the Run dialog box.2. Type regedit and press Enter to open Registry Editor.
2. Navigate (from the left pane) to this registry location/key:
HKEY_LOCAL_MACHINE\SOFTWARE\Microsoft\Windows Defender
3. (IMPORTANT): Before you continue, first take a backup of the "Windows Defender" registry key settings, and then use the backup file if something goes wrong. To take a backup of 'Windows Defender' key:
1. Right click on "Windows Defender" key and select Export.
2. Type a filename for the registry backup file (e.g. "Windows Defender") and Save the file at your Desktop. ** Note: If needed, double click at the exported .reg file, to restore your registry back!
4. Right click at the Windows Defender key and select Permissions.
5. At 'Permissions for Windows Defender' window, click Advanced.
6. Click Change Owner.
7. Type Administrators and press OK.
8. Check the "Replace owner on subcontainers and objects" checkbox and click Apply.
9. Then double-click to open Administrators entry.
10. Select the Full Control checkbox and press OK three (3) times. *
* Update (October 2019): After the latest Windows 10 system update, Microsoft doesn't allow to modify the permissions on the 'Windows Defender' key with error "Unable to save permission changes on Windows Defender. Access is denied". If you face this error, then skip the rest instructions of this step (press OK -> Cancel and OK to close the permissions window), and continue to Step-3 below.
11. At the right-pane of Windows Defender key:
11a. Open the DisableAntiSpyware REG_DWORD value and change the Value data from 0 to 1 disable Windows Defender Antispyware protection. Click OK when done. *
* Note: If you cannot edit (modify) the value data, then close and re-open Registry Editor or make sure that the "Real Time Protection' remains off (step-1).
11b. Then open the DisableAntiVirus REG_DWORD value and change the Value data from 0 to 1 disable Windows Defender Antivirus protection. Click OK when done.
12. Proceed to the the next step to disable Windows Defender Services.
Step 3. Disable Defender Security Center, Antivirus & Firewall Services.
The final step is to disable the Defender's services, as described below: *
* Note: If you cannot modify one (or more) of the mentioned registry values with error "Cannot Edit Start: Error writing the value's contents", then proceed and modify the registry offline, by following the steps at method-2 below.
1. To Disable the Windows Defender Security Center Service, modify the Start REG_DWORD value, from 2 to 4 at the following registry key:
Advertisements
HKEY_LOCAL_MACHINE\SYSTEM\CurrentControlSet\Services\SecurityHealthService
2. To Disable the Windows Defender Antivirus Service,modify the Start REG_DWORD value, from 3 to 4 at the following registry key:
HKEY_LOCAL_MACHINE\SYSTEM\CurrentControlSet\Services\WinDefend
3. To Disable the Windows Defender Antivirus Network Inspection Service, modify the Start REG_DWORD value, from 3 to 4 at the following registry key:
HKEY_LOCAL_MACHINE\SYSTEM\CurrentControlSet\Services\WdNisSvc
4. To Disable the Windows Defender Firewall Service, modify the Start REG_DWORD value, from 2 to 4 at the following registry key:
HKEY_LOCAL_MACHINE\SYSTEM\CurrentControlSet\Services\MpsSvc
5. Close registry editor and restart your computer.

Comments